Navigation in React Native using React Navigation
September 21, 2019

When you're building a mobile app, it will probably consist of multiple screens which the user will switch back and forth. Allowing the user to transition between different screens is a job of a navigator and this guide will cover it in detail. We will first understand how the navigation works followed by setting up navigation in your React Native application. Let's start.
Concept
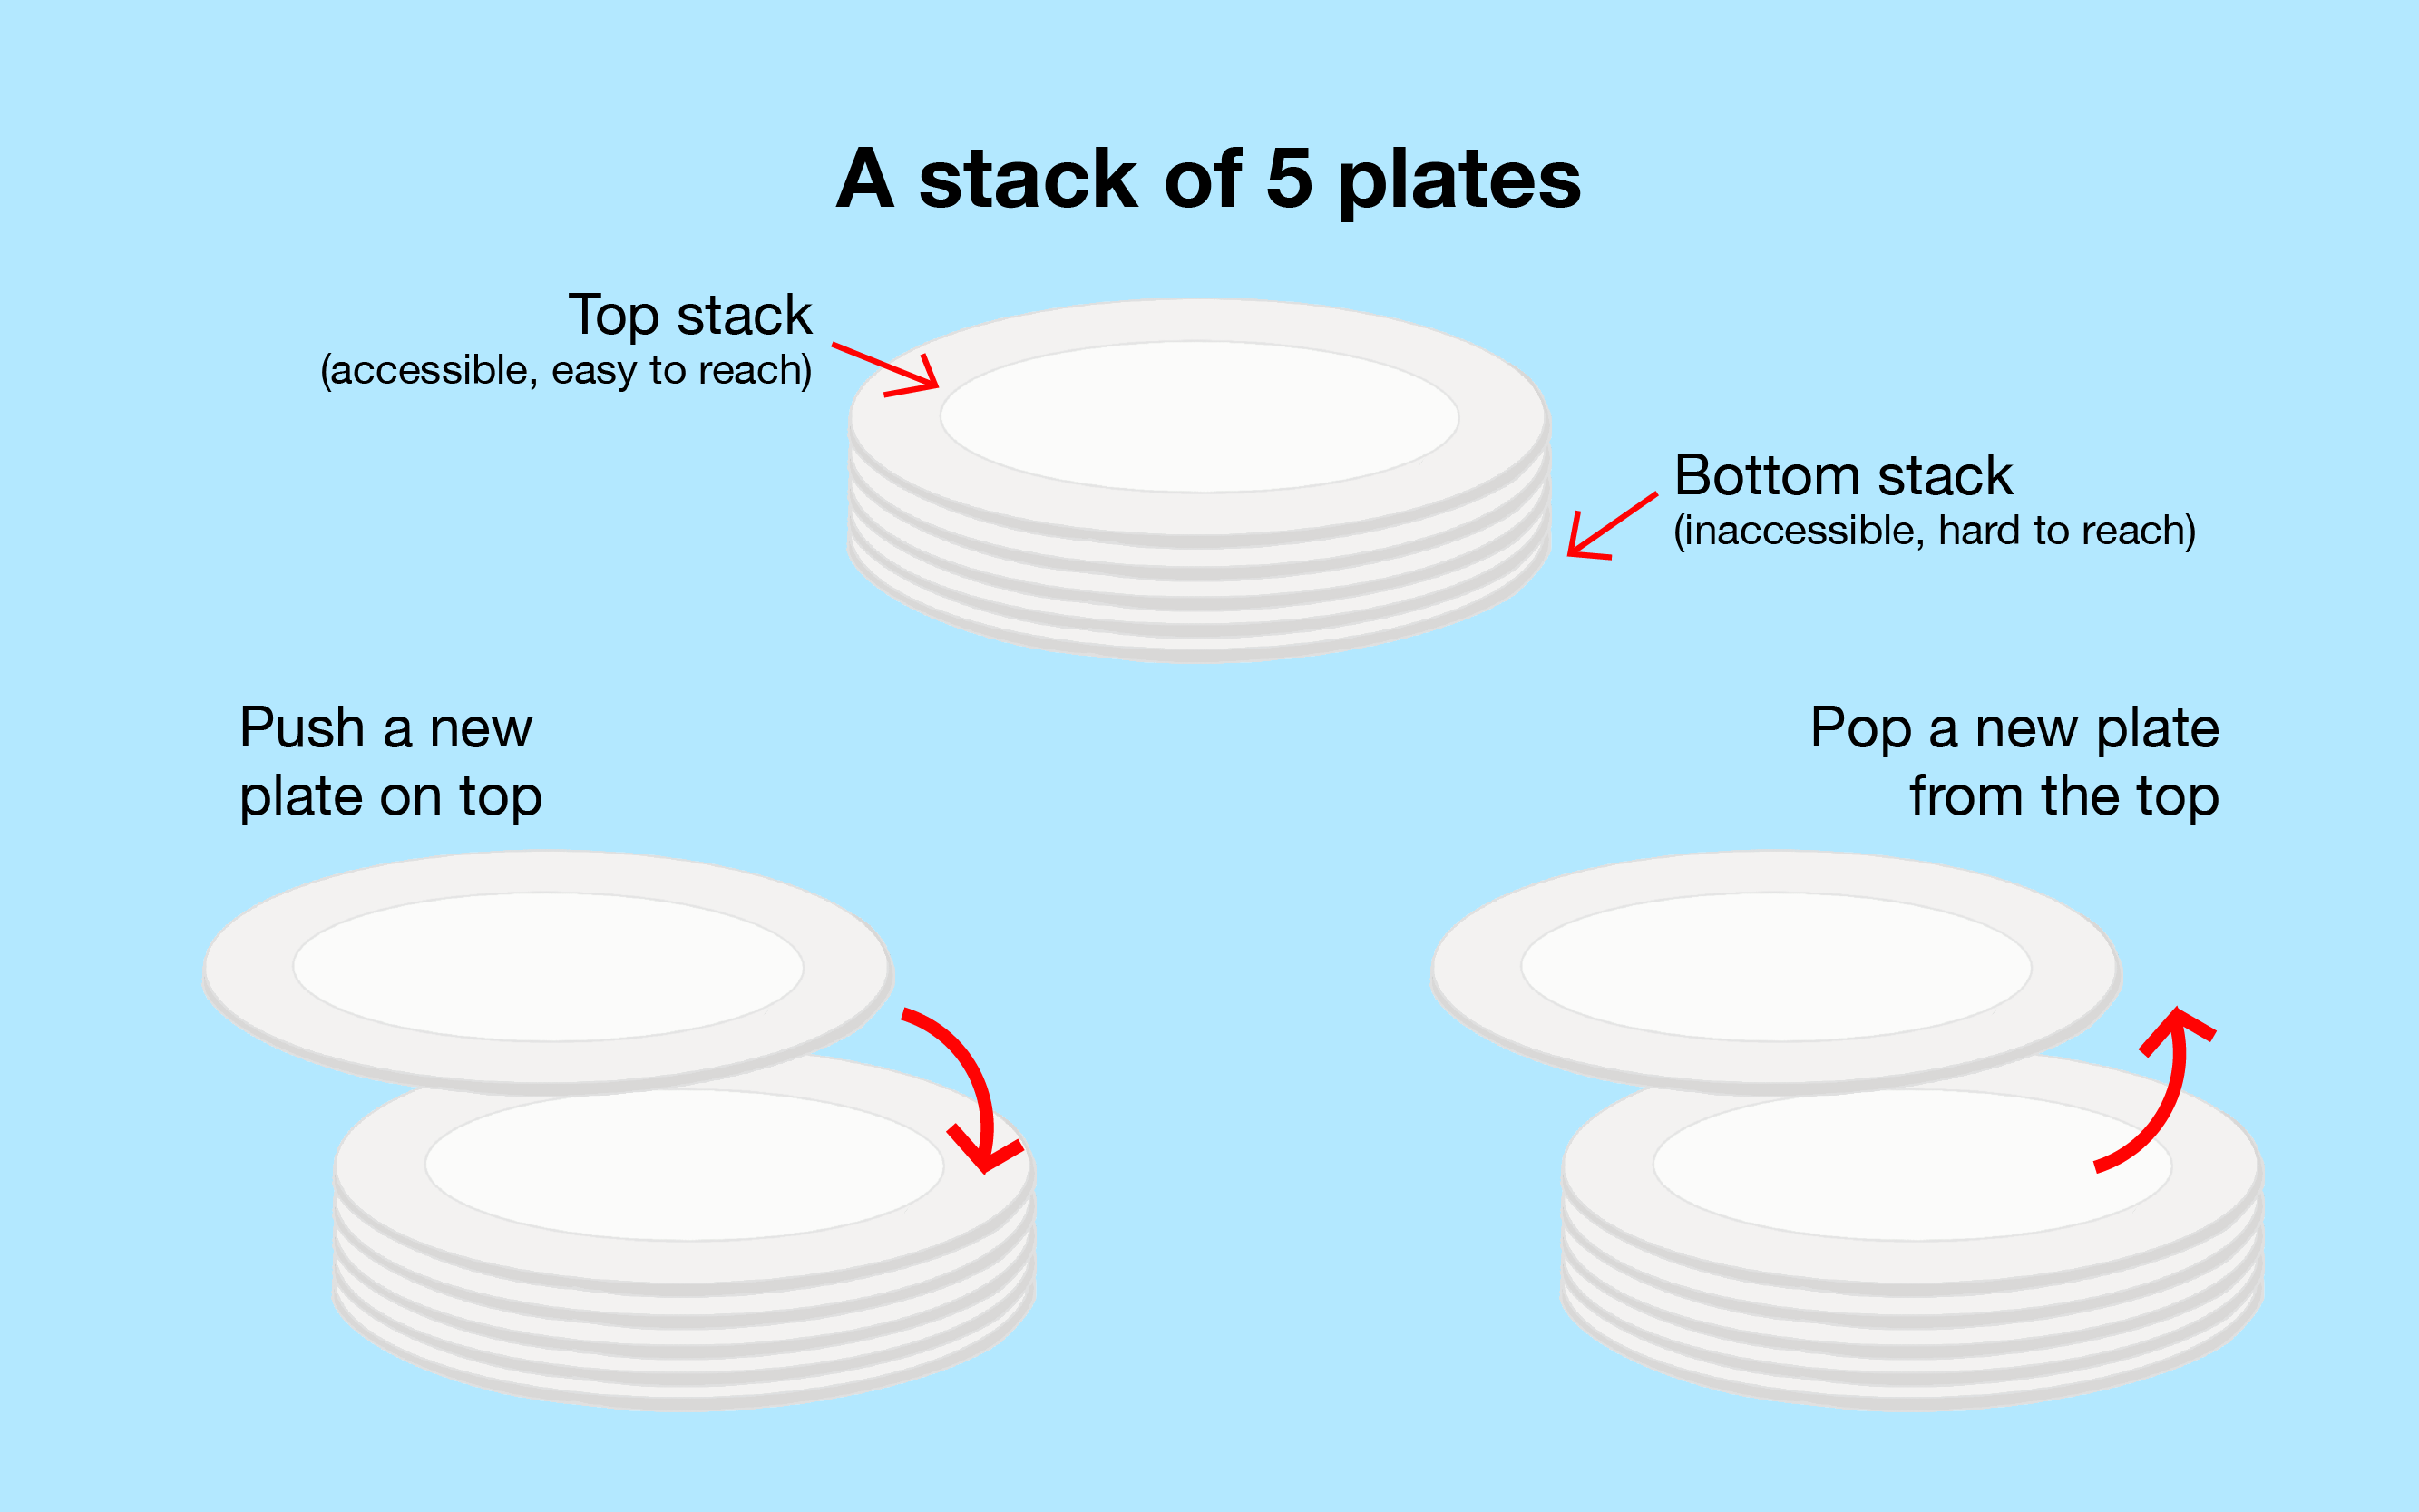
Navigation in apps works like a Stack.Consider a Stack which provides you with the functionality to push or pop screens into it. This is exactly what's happening.
When you navigate to a new screen, you actually push that screen into the Stack. It means that whenever you go to a new screen, it comes up on top. The Stack preserve the order in which you visited the screens and provides a smooth transition.
When you're going back, you're actually popping out the screen from the top of the Stack. You can visualize this with the example on a stack of books below:
We will need a navigator to perform these actions and react - navigation library provides an easy to use navigation solution for both Android and iOS. Let's setup react-navigation in our React Native app.
React Navigation Setup
I'm assuming you already have your React Native or Expo app created and running. Let's go through the installation step quickly.
Step 1. Install the react-navigation package in your React Native project.
yarn add react-navigationor with npm
npm install react-navigationStep 2. Install react native-gesture-handler and react-native-reanimated.
If you're using Expo, to ensure that you get the compatible versions of the libraries you should run:
expo install react-native-gesture-handler react-native-reanimatedOtherwise, just use yarn or npm directly:
yarn add react-native-gesture-handler react-native-reanimatedor with npm
npm install react-native-gesture-handler react-native-reanimatedStep 3. Link libraries
Next, if you are not using the Expo managed workflow then you need to link these libraries if you haven't already. The steps depend on your React Native version:
-
React Native 0.60 and higher On newer versions of React Native, linking is automatic. On iOS, to complete the linking, make sure you have Cocoapods installed. Then run:
cd ios
pod install
cd ..
On Android, it shouldn't need any more steps. But if you get errors regarding Android Support library during building the app, you need to install and configure
jetifier. -
React Native 0.59 and lower If you're on an older React Native version, you need to manually link the dependencies. To do that, run:
react-native link react-native-reanimated
react-native link react-native-gesture-handler
To finalize the installation of
react-native-gesture-handlerfor Android, be sure to make the necessary modifications toMainActivity.java:package com.reactnavigation.example;
import com.facebook.react.ReactActivity; //Add these lines import com.facebook.react.ReactActivityDelegate; import com.facebook.react.ReactRootView; import com.swmansion.gesturehandler.react.RNGestureHandlerEnabledRootView;
public class MainActivity extends ReactActivity {
@Override protected String getMainComponentName() { return "Example"; }
//Add this function @Override protected ReactActivityDelegate createReactActivityDelegate() { return new ReactActivityDelegate(this, getMainComponentName()) { @Override protected ReactRootView createRootView() { return new RNGestureHandlerEnabledRootView(MainActivity.this); } }; } }
Finally, run `react-native run-android` or `react-native run-ios` to launch the app on your device / simulator.

## Creating a Router and Navigating between screens
* Creating a router is pretty easy, we will create a file `Router.js` and import our screens in it.
```javascript
// Assuming you have two screens
import LoginScreen from './LoginScreen';
import HomeScreen from './HomeScreen';-
Now, we will create Stack Navigator by calling
createStackNavigatorand wrap it withcreateAppContainer.import LoginScreen from './LoginScreen'; import HomeScreen from './HomeScreen'; //import from react-navigation import {createStackNavigator, createAppContainer} from 'react-navigation';
//creating stack navigator const AuthStackNavigator = createStackNavigator({ Login: {screen: LoginScreen}, Home: {screen: HomeScreen}, });
//wrap the root navigator with createAppContainer const Router = createAppContainer(AuthStackNavigator);
//export to the root file of your app export default Router;
* Now we will navigate from LoginScreen to HomeScreen. Each screen component inside the navigator receives a *set of props* which we can use to perform navigation.
```javascript
class LoginScreen extends React.Component {

  render() {
    return (
      <View style={{ flex: 1, alignItems: 'center', justifyContent: 'center' }}>
        <Text>Login Screen</Text>
        <Button
          title="Go to Home"
          onPress={() => this.props.navigation.navigate('Home')}
        />
      </View>
    );
  }
}
//calling navigation.navigate on props with screen name that we set earlier-
Going back to a screen: The header provided by stack navigator will automatically include a back button when it is possible to go back from the active screen(when there is more than one screen). Sometimes you'll want to be able to programmatically trigger this behaviour, and for that, you can use
this.props.navigation.goBack();.class HomeScreen extends React.Component { render() { return ( <View style={{ flex: 1, alignItems: 'center', justifyContent: 'center' }}> <Text>Home Screen</Text> <Button title="Go back to Login" onPress={() => this.props.navigation.navigate('Login')} /> </View> ); } } - Go back multiple screens: Suppose you have multiple screens in your Stack and you want to dismiss all of them to go back to the first screen. In this case, you can use
navigation.popToTop().
Types of Navigator
There are multiple navigator which the react-navigation provides.These are:
- createStackNavigator
- createSwitchNavigator
- createBottomTabNavigator
- createMaterialTopTabNavigator
- createDrawerNavigator
We will go through each of them quickly and see an example.
1. createStackNavigator
The Stack Navigator allows arranging the screen like Stack as we have already seen above. You can add or remove screens just as you push or pop inside a Stack.
2. createSwitchNavigator
SwitchNavigator shoes only one screen at a time and doesn't preserve any stack. It resets the screen when you navigate to a new screen hence there is no functionality of going back. This behaviour can be very helpful when making an authentication flow. The example we wrote earlier can be updated as:
//creating SwitchNavigator in Auth flow ensures that the user can't go back after logging in.
const AuthStackNavigator = createSwitchNavigator({
  Login: {screen: LoginScreen},
  Home: {screen: HomeScreen},
});

const Router = createAppContainer(AuthStackNavigator);

export default Router;
3. createBottomTabNavigator
You may have seen many apps with tab-based navigation. The tabs can be at the bottom or top of the screen that lets you switch between different screens. Bottom Tab Navigator is a simple tab bar on the bottom of the screen. Usage:
import React from 'react';
import { Text, View } from 'react-native';
import { createBottomTabNavigator, createAppContainer } from 'react-navigation';

class HomeScreen extends React.Component {
  render() {
    return (
      <View style={{ flex: 1, justifyContent: 'center', alignItems: 'center' }}>
        <Text>Home!</Text>
      </View>
    );
  }
}

class SettingsScreen extends React.Component {
  render() {
    return (
      <View style={{ flex: 1, justifyContent: 'center', alignItems: 'center' }}>
        <Text>Settings!</Text>
      </View>
    );
  }
}

const TabNavigator = createBottomTabNavigator({
  Home: HomeScreen,
  Settings: SettingsScreen,
});

export default createAppContainer(TabNavigator);
4. createMaterialTopTabNavigator
A material-design themed tab bar on the top of the screen that lets you switch between different routes by tapping the route or swiping horizontally. Usage:
createMaterialTopTabNavigator(RouteConfigs, TabNavigatorConfig);5. createdDrawerNavigator
The Drawer Navigator allows you to present a navigation menu to your users. You can swipe right or left to open or close the drawer and switch between different screens. It provides a default Header which is common to all the screens inside Drawer Navigator. Go to this link to read more. Example:
class HomeScreen extends React.Component {
  render() {
    return (
      <View style={{ flex: 1, justifyContent: 'center', alignItems: 'center' }}>
        <TouchableOpacity onPress={this.props.navigation.openDrawer}>
          <Text>Open Drawer</Text>
        </TouchableOpacity>
        <Text style={{ fontWeight: 'bold', marginTop: 20 }}>Home</Text>
      </View>
    );
  }
}

class SettingsScreen extends React.Component {
  render() {
    return (
      <View style={{ flex: 1, justifyContent: 'center', alignItems: 'center' }}>
        <TouchableOpacity onPress={this.props.navigation.openDrawer}>
          <Text>Open Drawer</Text>
        </TouchableOpacity>
        <Text style={{ fontWeight: 'bold', marginTop: 20 }}>Settings</Text>
      </View>
    );
  }
}

const DrawerNavigator = createDrawerNavigator(
  {
    Home: HomeScreen,
    Settings: SettingsScreen,
  },
  {
    drawerBackgroundColor: 'rgba(255,255,255,.9)',
    contentOptions: {
      activeTintColor: '#fff',
      activeBackgroundColor: '#6b52ae',
    },
  }
);

export default createAppContainer(DrawerNavigator);
So we have covered all the basics of navigation in React Native. You can go through the official website to know all the route configuration properties available. I hope you had fun learning React Native Navigations.
Join Free and Open Community
Become A Sleek Freelance Pro !!
Get curated remote/freelance jobs by email. Learn from industry veterens and experts.
Get personal help. No fillers and generic advice.
Connect With Me!!
+91 9922234778
hi@kapil.io


