How to add Push Notification in React Native for Android
August 18, 2019
We will use react-native-firebase to add push notification in our react-native app and hopefully save your time implementing it.
Steps involved:-
- Create react-native project
- Create an application on firebase console
- Add react-native-firebase
- Add Firebase Messaging and Notification Module
- Test Notification on Device
- Listening Notification
Let's get started.
Step 1. Create a React Native Project
Let's create a React Native Project to start implementing Push Notification service. I'm using react-native@0.60.4 which is the latest at the time of writing this article. Go to the terminal and run this command.
react-native init pushNotificationYou can replace pushNotification with the project name of your choice.
Step 2. Create an application on firebase console
Let's create an application on the firebase console to use the Firebase SDK. Go here and create an application.
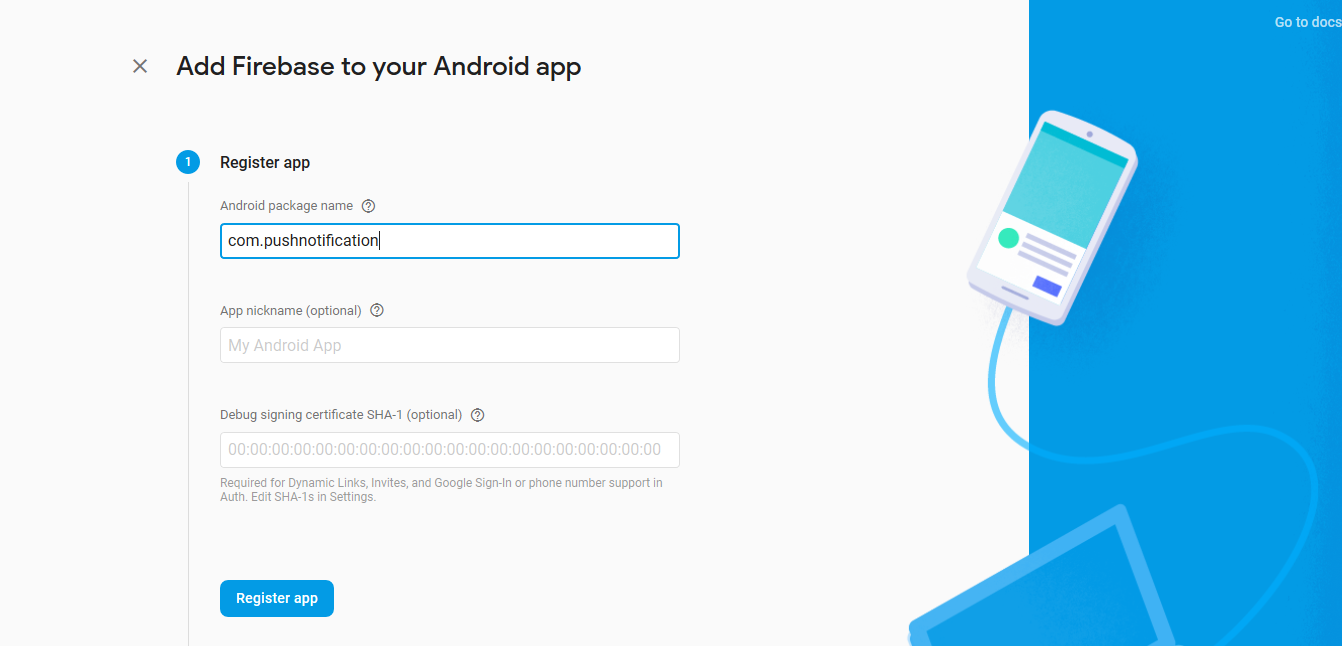
- Click on Add Project.
- Add iOS and Android app and follow the steps. Make sure the project name in Register app section matches with your react-native project (
com.pushnotificationin our case).
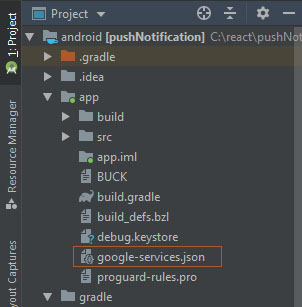
- Download
google-services.jsonand paste it inside/pushnotification/android/app/. Make sure the location is correct.
- Add libraries as instructed and Sync Project. This will look something like this:-
- Project-level build.gradle
dependencies { classpath("com.android.tools.build:gradle:3.4.1") classpath 'com.google.gms:google-services:4.3.0' //Add this line }- App-level build.gradle
dependendies {
    implementation fileTree(dir: "libs", include: ["*.jar"])
    implementation "com.facebook.react:react-native:+"
    implementation 'com.google.firebase:firebase-core:17.0.1' // Add this line
    implementation 'com.google.firebase:firebase-messaging:19.0.1' // Add this line

    if (enableHermes) {
    def hermesPath = "../../node_modules/hermesvm/android/";
    debugImplementation files(hermesPath + "hermes-debug.aar")
    releaseImplementation files(hermesPath + "hermes-release.aar")
    } else {
    implementation jscFlavor
    }
}
//Add to the bottom of the file
apply plugin: 'com.google.gms.google-services'
Please use the latest firebase dependency available. You can also add it from Android Studio by going to:
File -> Project Structure -> DependenciesStep 3. Add react-native-firebase
Go to your project root directory and run this command.
npm install react-native-firebase --save(Optional) Link the module if your react-native version is less than 0.60.
react-native link react-native-firebaseReact Native version (>0.60) supports autolinking.
Follow the Manual Linking guide if you're having issues with linking react-native-firebase or you're using an earlier version of React Native.
Manual Linking for React Native(<0.60)
Check out the official docs for updated method.
Android
- Add
react-native-firebaseto App-levelbuild.gradle
dependencies {
    // ...
    implementation project(':react-native-firebase') // Add this line
}- Edit
settings.gradle
//Add these lines
include ':react-native-firebase'
project(':react-native-firebase').projectDir = new File(rootProject.projectDir, '../node_modules/react-native-firebase/android')- Edit
MainApplication.java
    import...
    import io.invertase.firebase.RNFirebasePackage; // import core package

    @Override
    protected List<ReactPackage> getPackages() {
      return Arrays.<ReactPackage>asList(
        new MainReactPackage(),
        new RNFirebasePackage(), // Add this line
      );
}- Sync Project and we are good to go.
Step 4. Add Firebase Messaging and Notification Module
We have to include other modules as the RNFirebasePackage we imported earlier provides the core features only.
- Add the dependency to
android/app/build.gradlefile:
dependencies {
  // ...
  implementation 'com.google.firebase:firebase-messaging:19.0.1'

}- Edit
MainApplication.java:
import...
// import these two packages
import io.invertase.firebase.messaging.RNFirebaseMessagingPackage;
import io.invertase.firebase.notifications.RNFirebaseNotificationsPackage

@Override
protected List<ReactPackage> getPackages() {
    return Arrays.<ReactPackage>asList(
        new MainReactPackage(),
        new RNFirebasePackage(),
        new RNFirebaseMessagingPackage() // Add this line
        new RNFirebaseNotificationsPackage() // Add this line
    );
}- Sync Project and we are done.
Check out official docs for updated method.
Step 5. Test notification on the device
Now that we have added all the required libraries hence we should be able to receive a notification. Let's test it out but first make sure your app is in background.
- Go to firebase console
- Click on Cloud Messaging on the left panel.
- Click on Send your first message.
- Enter Notification text-> Click Next->Choose Target->Select app in User Segment.
- Publish notification and check device.
I hope you're able to get a test notification on your device. Let's move on to next section.
Step 6. Listening Notifications
This part involves three steps: -
- Check Permissions
- Request Permissions
- Listen for Notifications
Check Permissions
We need to ensure that user has granted required permissions so that we can receive Notifications:
- Import firebase module.
import firebase from 'react-native-firebase';- Check for permission in
componentDidMount(). If permission hasn't been granted then ask for permission inaskPermission()otherwise fetch thetoken.
async componentDidMount(){
    const granted = await firebase.messaging().hasPermission();
    if (granted) {
        this.fetchToken();
    } else {
        this.askPermission();
    }
}
Request Permissions
Request the permissions if not already granted. This step is very important in case for iOS Plateform.
- Ask permission if not already granted. Fetch token once the permission is granted
    async askPermission(){
        try{
            await firebase.messaging().requestPermission();
            console.log('Permissions allowed');
            this.fetchToken();
        } catch(error) {
            console.log('Permissions denied');
        }
}- Check if the token is already saved. If not then
getTokenfromfirebasemodule and save it inAsyncStorage.
    async fetchToken(){
        let fcmToken = await AsyncStorage.getItem('fcmToken');
        if (!fcmToken) {
        fcmToken = await firebase.messaging().getToken();
            if (fcmToken) {
                await AsyncStorage.setItem('fcmToken', fcmToken);
            }
        }
    }
Listen for Notifications
Firebase Notifications can be of three different types:
- notification-only messages from FCM
- notification + data messages from FCM
- local notifications
A notification will trigger one of these listeners depending on the state of your application:
- onNotificationDisplayed - Triggered when a particular notification has been displayed.
- onNotification - Triggered when a particular notification has been received
- onNotificationOpened - Triggered when your app is in background and opened when a notification is clicked.
- getInitialNotification - Triggered when your app is closed and opened when a notification is clicked.
componentDidMount() {
    this.notificationDisplayedListener = firebase.notifications().onNotificationDisplayed((notification) => {
        // Process your notification as required
    });

    this.notificationListener = firebase.notifications().onNotification((notification) => {
        // Process your notification as required
    });

    // App (in background) was opened by a notification
    this.notificationOpenedListener = firebase.notifications().onNotificationOpened((notificationOpen) => {
        // Get the action triggered by the notification being opened
        const action = notificationOpen.action;
        // Get information about the notification that was opened
        const notification = notificationOpen.notification;
    });

    // App was opened by a notification
    const notificationOpen = await firebase.notifications().getInitialNotification();
    if (notificationOpen) {
        // Get the action triggered by the notification being opened
        const action = notificationOpen.action;
        // Get information about the notification that was opened
        const notification = notificationOpen.notification;
    }
}

componentWillUnmount() {
    this.notificationDisplayedListener();
    this.notificationListener();
    this.notificationOpenedListener();
}
Note: On Android, unfortunately there is no way to access the title and body of an opened remote notification. You can use the data part of the remote notification to supply this information if it's required.
I hope you're able to receive the notification successfully by now.
How to trigger a Push Notification from server
We will use fcm-node node module to make our task easier.
You will need two things to trigger a notification.
- Server Key from Firebase Console.
- Registration token from device.
Get Server Key from Firebase Console
Follow these simple steps:
- Go to Firebase Console.
- Go to Project Overview and open Project Settings.
 3. Go to Cloud Messaging and copy the Server Key from Project credentials
Get Registration token from device
Check out
fetchToken()function we wrote earlier
Acquire token from AsyncStorage.
let fcmToken = await AsyncStorage.getItem('fcmToken');Now we are ready to trigger the notification from server.
Sending Push Notification
Run this command in your root server project and install the required module.
$ npm install fcm-nodeSending a Push Notification require 3 simple steps:
Step 1. Import module and setup server key.
    var FCM = require('fcm-node');
    var serverKey = 'SERVER_KEY'; //put your key here
    var fcm = new FCM(serverKey); //pass it to FCM constructor
Step 2. Define message body to send
var message = { //based on message type (single recipient, multicast, topic, et cetera)
        to: 'registration_token', // saved in fcmToken variable
        collapse_key: 'your_collapse_key', //if you want the notification to be collapsible

        notification: {
            title: 'Title of your push notification',
            body: 'Body of your push notification'
        },

        data: {  //you can send only notification or only data(or include both)
            my_key: 'my value',
            my_another_key: 'my another value'
        }
    };
If you want the notification to be collapsible means that the notification may be 'overwritten' in a sense, by another similar message with the same collapse_key value.
Let me explain collapse_key in more details.
If there is already a message with the same collapse key (and registration token) stored and waiting for delivery, the old message will be discarded and the new message will take its place (that is, the old message will be collapsed by the new one).
However, if the collapse key is not set, both the new and old messages are stored for future delivery.
Go to this link for further reading about the different payload properties of message body: https://firebase.google.com/docs/cloud-messaging/http-server-ref#notification-payload-support
Step 3. Send the Notification
fcm.send(message, function(err, response){
    if (err) {
        console.log("Something has gone wrong!");
    } else {
        console.log("Successfully sent with response: ", response);
    }
});
That's it. We have successfully completed setting our server to trigger Push Notification.


